A tendon is a thick fibrous band of connective tissue that connects muscle to bone. The Achilles tendon is located at the rear of the leg and connects the calf muscles to the foot. This tendon will allow for stretch and recoil of the calf muscles and will also transmit force between the muscles and foot.
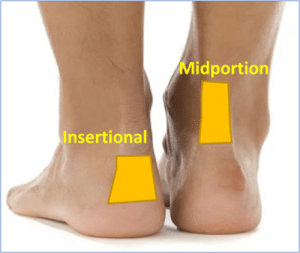
Achilles tendinopathy often presents with pain in either the mid-portion, or insertion of the tendon at the heel and it is painful to touch. There may also be thickening in the tendon.
Evidence suggests there are two main stages of the disease: a reactive stage and a degenerative stage, all with varying symptoms.
Reactive—an acute stage, where the Achilles can be constantly painful and wake you at night. There can also be swelling around the tendon. This needs to be managed by avoiding activities which aggravate the pain and using ice to help it settle.
Degenerative— this is the chronic stage where the tendon is no longer acutely painful, but the tendon healing has plateaued. This stage will require a loading exercise programme.
Managing weight is important, therefore a balanced healthy diet is encouraged. This will aid your recovery and long-term health. Moderate alcohol use is a risk factor for Achilles tendinopathy.
Pain-Management
It not uncommon for your Achilles to be painful. Avoiding activity all together is not recommended in the long term. Do not be alarmed if your Achilles aches after exercise, this is to be expected. Medication such as ibuprofen might interfere with the body’s ability to repair the tendon so paracetamol is preferred. An ice pack can help but be careful not to put ice or heat packs directly on the skin – wrap them with a tea towel cover.
Activity is encouraged although adaptation is important. At times high impact activities might need to be scaled back to introduce activities that allow your tendon to recover but keep you active. Monitoring step count or intensity of walking are ways to modify your activity.
Heel lifts or Cup
A heel lift is designed to offer cushion and reduce the pull of the Achilles tendon This has be shown to help some patients in recovery. Place this at the base of the heel inside your shoes.
Generally, avoiding footwear that aggravates your symptoms is advised. However, we need to be careful about this as sometimes the shoes might not be the aggravator it might simply be the task you’re doing. We advise wearing a practical, cushioned, stable shoe with a 8-10mm heel support, (such as running trainers or walking shoes) avoid flat and unsupportive options.
A running trainer is recommended in the recovery of your foot pain and is likely to assist in the symptom reduction phase. Avoiding dress shoes, hard heeled shoes, or backs of shoes that aggravate your symptoms. Often using Achilles heel protectors can assist in symptom relief.
Insoles and foot orthotics are not routinely recommended. In some instances, whereby the patient has failed to recover or a flatter foot posture and might benefit from further support. Some insoles will be more cushioned based i.e., with a soft heel lift or some will have more structure i.e., arch support. There is no one size fits all approach, but you can access these yourself online.
These can help reduce the pain in the tendon and restore the functionality but will take time to implement. A lot of exercises can be done at home, although seek advice from a health professional if you are unsure.
The exercises programmes are slightly different for insertional and mid-portion Achilles tendinopathy.
Insertional Achilles Tendinopathy Loading
You may have been assessed by a clinician and this program is a framework to build on, exercises could be added or taken away accordingly.
Phase 1:
Everyone is different with timelines so do not worry if you spend longer in a phase.
Patient status: Pain and difficulty with all activities
Goal: Start to exercise, aim to offer some pain relief in the initial phase
The following exercises can help with pain in the initial phase, although progression onto stage 2 is advised if these are relatively easy. Start without weight but then introduce this to all three exercises.
Phase 1: Seated Heel Raise Isometric Holds
Sit with your knee bent at 90 degrees, foot flat to the floor
Raise the heel (injured Achilles side) off the ground to full height. Slow and controlled movement is encouraged.
Hold for 45 seconds, then slowly lower the heel to the ground, 2mins rest, 5 repetitions.
Once this is doable to provide some further resistance place a heavy object on your knee (heavy textbook).
Patient status: Pain has improved with phase 1 but still struggling with functional tasks move onto phase 2 loading
Goal: Progress from phase 1. Now it’s time to push to discomfort and this can sometimes cause pain at the tendon- do not be concerned. If the pain has increased until the next day reduce some of the reps/sets appropriately
Phase 2: Seated Heel Raise
Sit with your knee bent at 90 degrees, feet flat to the floor
Slowly raise both heels off the ground to full height (control rising)
Hold for 3 seconds then slowly lower to the ground.
Patient status: Handled the phase 3 exercise program, no pain in the tendon at the insertion towards the heel bone, possibly decreased or increased morning stiffness
Goal: Heavier strength training, increase or start more physical activity. To do all phase 3 exercises as 1 set but 3 times with heavier load, 2-3 times/week
Patient Status: Pain has improved with phase 1 but still struggling with functional tasks move onto phase 2 loading
Goal: Progressed from phase 1. Now time to push to discomfort and this can sometimes cause pain at the tendon- do not be concerned. If the pain has increased until the next day reduce some of the reps/sets appropriately.
Phase 2: Seated Heel Raise
Sit with your knee bent at 90 degrees, feet flat to the floor
Slowly raise both heels off the ground to full height (control rising)
Hold for 3 seconds then slowly lower to the ground.
Patient status: Handled the phase 3 exercise program, no pain in tendon where it attaches to the heel bone, possibly decreased or increased morning stiffness.
Goal: Heavier strength training, increase or start more physical activity
To do all exercises at 1 set but 3 times a day and with heavier load, 2-3 times a week. This could be a backpack with books in on your back
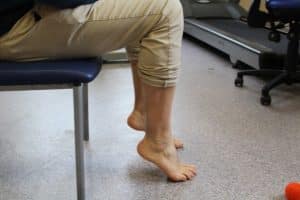
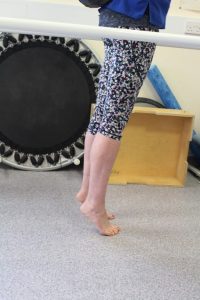
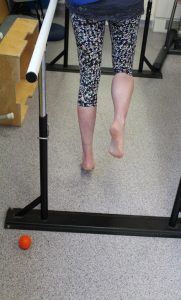
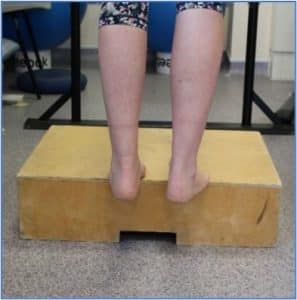
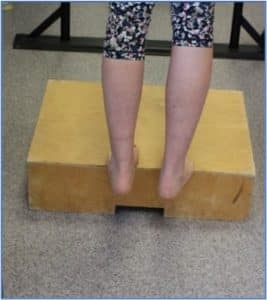
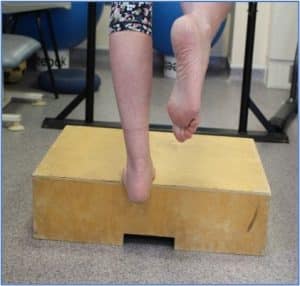
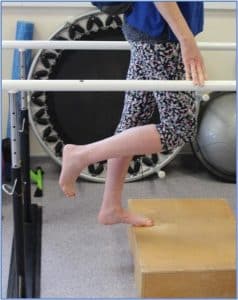
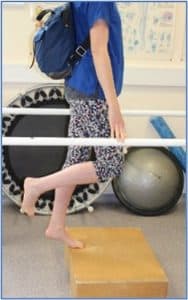
Phase 4: Single Leg Heel Raise on a Step
Phase 3 exercise but now with added weight i.e backpack add heavy books to provide further resistance.
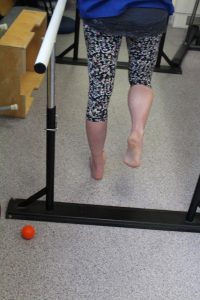
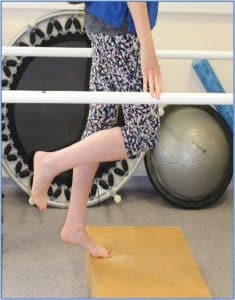
Phase 4: Eccentric heel raises on a Step
See phase 3 exercise but now with added weight i.e backpack add heavy books to provide further resistance
It is normal to feel some discomfort, but do not push yourself to the point where you’re in pain for 12 hours or more. Be very careful with any activity you do and pace your return to exercise. Pain is the warning sign; don’t ignore it.
You should expect mild – moderate pain that stops with rest. Do not continue if pain persists all day
Radial Extracorporeal Shockwave Therapy (ESWT) is a non-invasive treatment that involves passing high energy pressure waves into affected tissue to increase blood flow and stimulate repair. The body responds to shockwave by increasing the blood circulation and metabolism in the affected area which is thought to accelerate the body’s own healing processes. Evidence shows it may help in the treatment of chronic tendinopathies when used alongside other forms of conservative treatment, such as exercise, weight loss and pain killers.
This can involve surgical debridement of the tendon with removal for abnormal tissue and allow the tissue to repair. Sometimes a gastrocnemius release is performed to reduce tendon tension.
There are risks to foot and ankle surgery (can these expand out when clicked on)
Off-work There will be a requirement to elevate your foot and rest non weight bearing then semi weight bearing.
Swelling and Stiffness- The foot can swell as a response to surgery and as part of the healing process. It can take up to six months for swelling to completely settle in some cases. Although in some cases post-surgery there may be increased stiffness in the foot.
Infection- The act of surgery is invasive which is also a risk to infection. In some cases, this can delay healing and will require antibiotic treatment.
Bloods Clots- A small risk of developing a blood clot after foot surgery. Following the pre and post operative advice will help reduce this risk.
Numbness- Can exist in the surgical site if there has been disruption to a nerve.
Chronic Regional Pain Syndrome Surgery can sometimes result in a swollen, painful and highly sensitive foot. This can be challenging to manage and often patients will be referred to the pain clinic for support.
If you are struggling to manage your foot condition?
Contact your general practice if you need further help and guidance, a referral to local musculoskeletal services is required in some instances, and they can advise on appropriate treatment or pathways suitable to you.